This tutorial will show you how to use MilkShape 3D for Unreal Tournament 2003. It will show how to prepare and export a model from inside of MilkShape 3D into UnrealEd and Unreal Tournament 2003.
You will need the following programs:
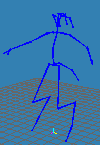
As usually, you have a made a model and attached all vertices to the skeleton. In this tutorial I will import AlienFemaleA.psk from the Unreal Tournament 2003 CD3. Please note, that the skeletons of those models are most invalid. In UnrealEd you can compare the structures of the existing skeletons with the newly imported ones. You will notice, that they are different. For tutorials how to use UnrealEd and how to load packages, import PSK models, etc. please visit the Unreal Developer Network or more specifically the Animation Browser Tutorial.
The problems with those skeletons are invalid parent bone indices or sometimes the Thigh bones are connected to Bip01 Spine instead of Bip01 Pelvis.
So you need to have the correct skeleton first. You can import them from the ./skeletons sub directory of the MilkShape 3D installation.
Then import the AlienFemaleA.psk from the Unreal Tournament 2003 CD3. If there is a skeleton already, MilkShape 3D assigns the vertices to the existing bones by name.

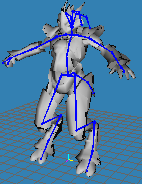

If you want you can tweak the model a little. I made the tail a bit thicker. If you are ready with your model, export it to PSK again using the menu File->Export->Unreal/UT PSK/PSA.... Note, that you have to write the extension of the filename, so that MilkShape 3D knows, if you want to export PSK (skeleton+mesh+vertex weights) or PSA (skeleton+animation).
Now that you have exported the new model, you can continue with the Animation Browser Tutorial Importing the Model and Rig (.PSK).
I'll show you a few tips, in addition to the tutorial by Epic Games.
Now save the package and if you overwrite an existing one, then make sure you have made a backup before.
Now you have the package with your model inside, but you need to let Unreal Tournament 2003 know, where it is and how it is called.
If you add your model to original packages, then open XPlayers.int and add the following line below the AlienFemaleAA line. I named the new model Mohara2, because it is just a modified AlienFemaleA model.
AlienFemaleCA="Name: Mokara2|Age: 20|Race: Gen Mo'Kai||Data:|Damarus' sister, and second in line to the scepter of Mobeth, Mokara feels that her brother is unworthy of the title and seeks to usurp it by proving herself the better in battle. Quiet and reserved, she watches her enemies closely for hidden weaknesses.||"
Then open xplayersL1.upl and add the following line below the other Mohara line.
Player=(DefaultName="Mokara2",Mesh=Aliens.AlienFemaleC,species=xGame.SPECIES_Alien,BodySkin=PlayerSkins.AlienFemaleABodyA,FaceSkin=PlayerSkins.AlienFemaleAHeadA,Portrait=PlayerPictures.cAlienFemaleAA,Text=XPlayers.AlienFemaleCA,Sex=Female,CombatStyle=-0.3,Aggressiveness=-0.2,FavoriteWeapon=xWeapons.ShockRifle,Accuracy=0.5)
If you make a new package for example Hunter.ukx and Hunter.utx, then you only need a Hunter.upl with that content:
[Public]
Player=(DefaultName="Hunter",Mesh=Hunter.HunterMale,species=xGame.SPECIES_Jugg,BodySkin=Hunter.htext1,FaceSkin=Hunter.htext2,Portrait=Hunter.bio,Text=Xplayers.hunter,Sex=Male,Menu="SP",Tactics=+0.2)
You can download other UT2003 player models and see how they are set up. The .ukx file comes into the ./Animations sub-directory, the .utx file comes into the ./Textures sub-directory and the .upl file comes unto the ./System sub-directory.
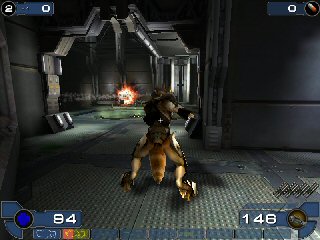
Now fire up Unreal Tournament 2003 and play with your new model!
- Mete